As a creator, you can now build and deploy an NFT collection on Coinbase NFT with tools to mint on the blockchain to all users. Minting on Coinbase NFT provides you with the following benefits:
Ownership:
Creator-owned contracts: you own the smart contract
Your Coinbase NFT minted work, including the metadata and royalties, will be compatible on all Ethereum-based marketplaces, not just Coinbase NFT.
If you mint on Coinbase NFT, your work will also be automatically compatible with any changes we make as new features are rolled out.
Ease & simplicity:
Coinbase will manage the end-to-end process, including contract deployment and posting your images and metadata to decentralized storage.
Using Coinbase NFT’s intuitive interface saves you the time, cost, and effort that goes into building minting into a custom website.
Security:
Coinbase NFT contracts have been battle tested and audited to prevent exploitation.
Give your collectors peace of mind by sending them to a trusted Coinbase NFT link to mint.
Deploying an NFT smart contract on Base is easy. This guide will help you mint an NFT to your wallet and launch a collection for public minting.
Contract type
You'll be deploying a 721 Open Edition contract. You'll own this contract fully, allowing you to set your price and close it at your discretion.
Requirements
You need to have ETH on Base. If you don't, you can use the Coinbase app to buy Ethereum on Base. A minimum of $5 is recommended to start. The cost to deploy your first smart contract is estimated to be about $2.
Deployment steps
Upload an image or take a photo.
Enter the name, set a price (optional), and provide a description.
Pay the gas fee and sign the three transactions.
Wait for the smart contract creation and then share the link.
Outcome
At the end, you will have:
Deployed a unique smart contract.
Received the first NFT of the contract in your wallet.
Set a standard image for the entire collection with each token being sequentially numbered.
Listed the NFT for sale or free minting to the public.
Post-deployment changes
You can manage your collection by going to Manage collection on your profile or thirdweb.com/base/<contractaddress>. From here, you can:
Change the Image: Go to NFT, Set metadata tab
Close Public Minting: Go to Remove public claim condition
Adjust the Price: Go to Edit price in the claim condition
Restrict Purchasers: Go to Claim condition where you can add an allowlist or restrict purchases to the owner only
721 Open Edition contracts
The OpenEdition ERC721 contract is for NFTs with common metadata. Each NFT has a unique token ID. As an admin, you can set this shared metadata whenever you wish. This contract doesn't require a maximum supply for NFTs. Instead, the admin can set "claim phases" that can be turned off at any time.
Navigate to the top right corner of your profile and click the ‘Create’ button. You can also find this button on the Created section of your profile.
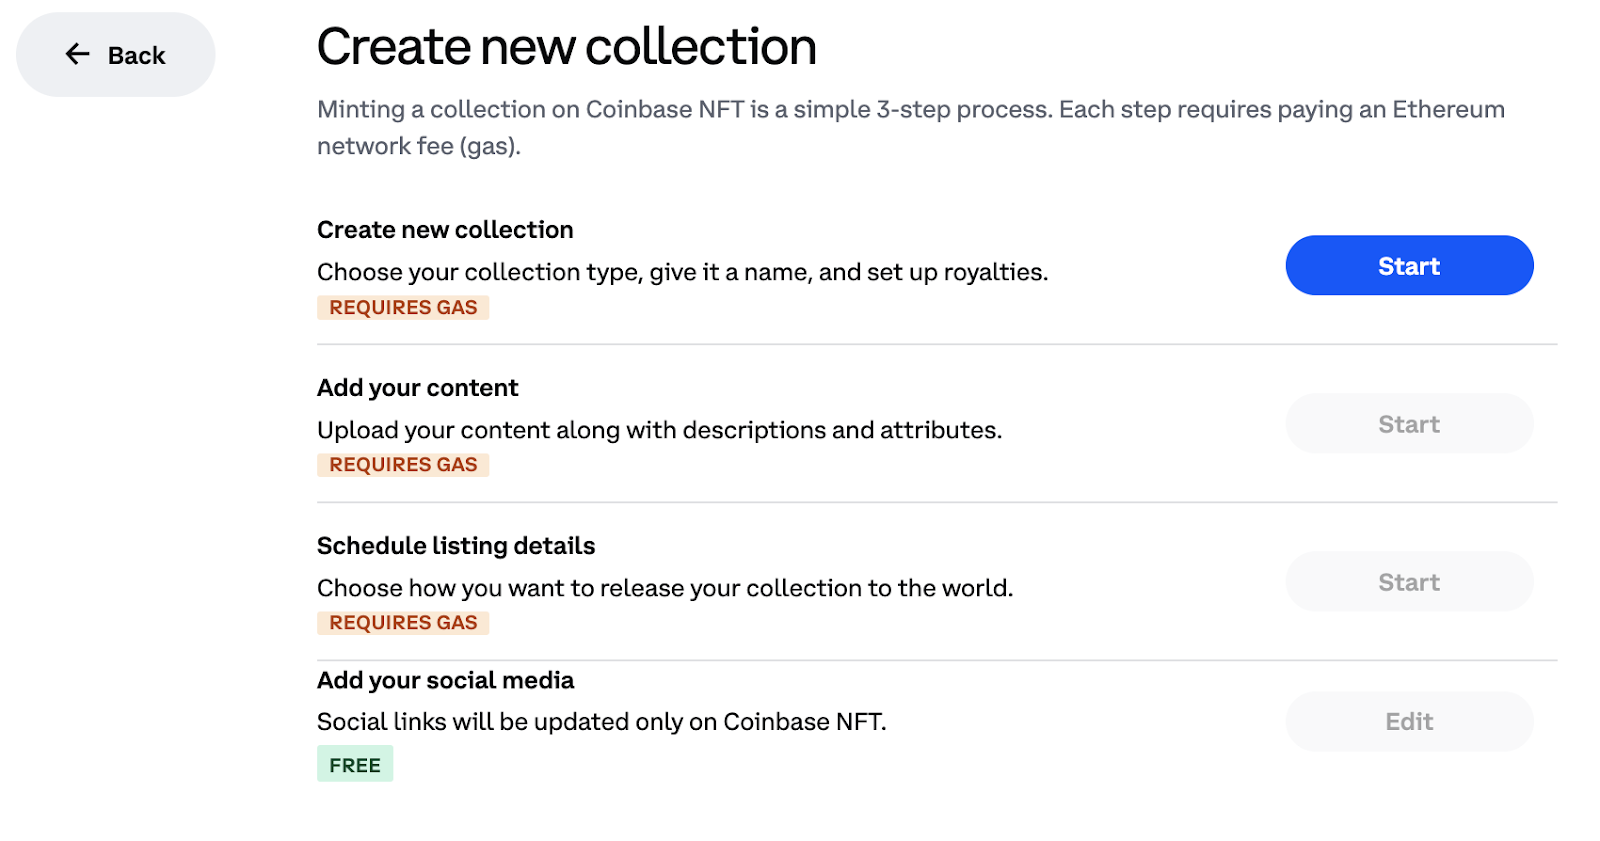
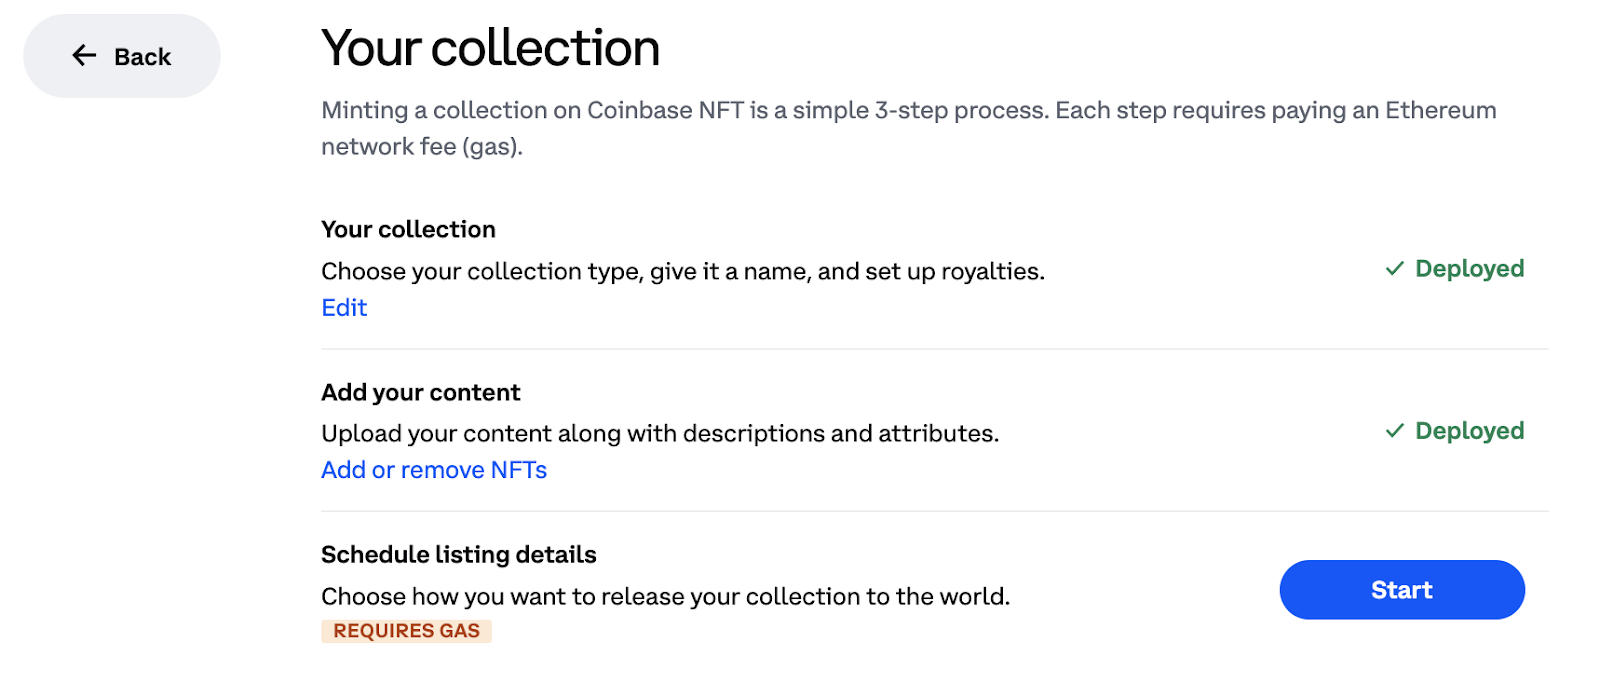
On the create a collection page, there are 3 steps you need to follow, each of which will require a gas fee to complete:
Step 1: Create a collection
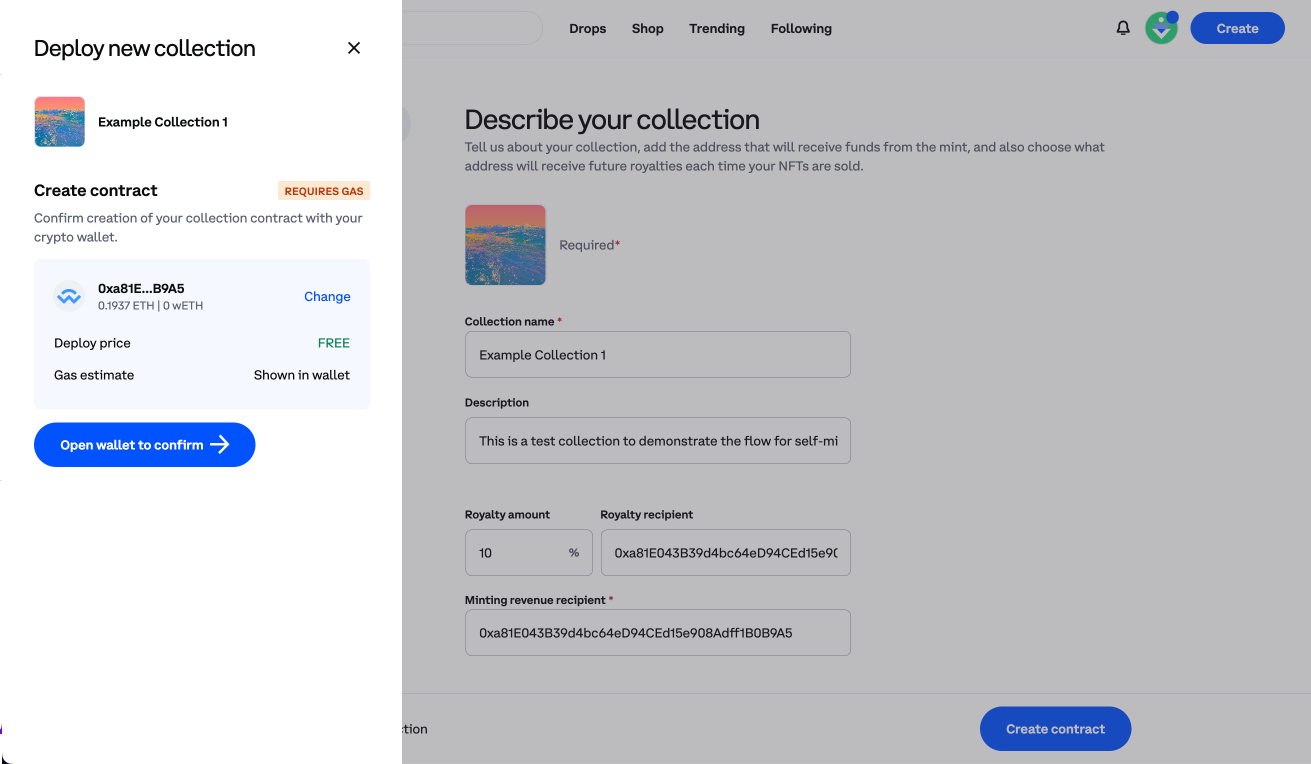
A. Select “Start” on the “Create new collection” line:
B. Select ERC-721 for the collection type. We also provide support for ERC-1155 collections.
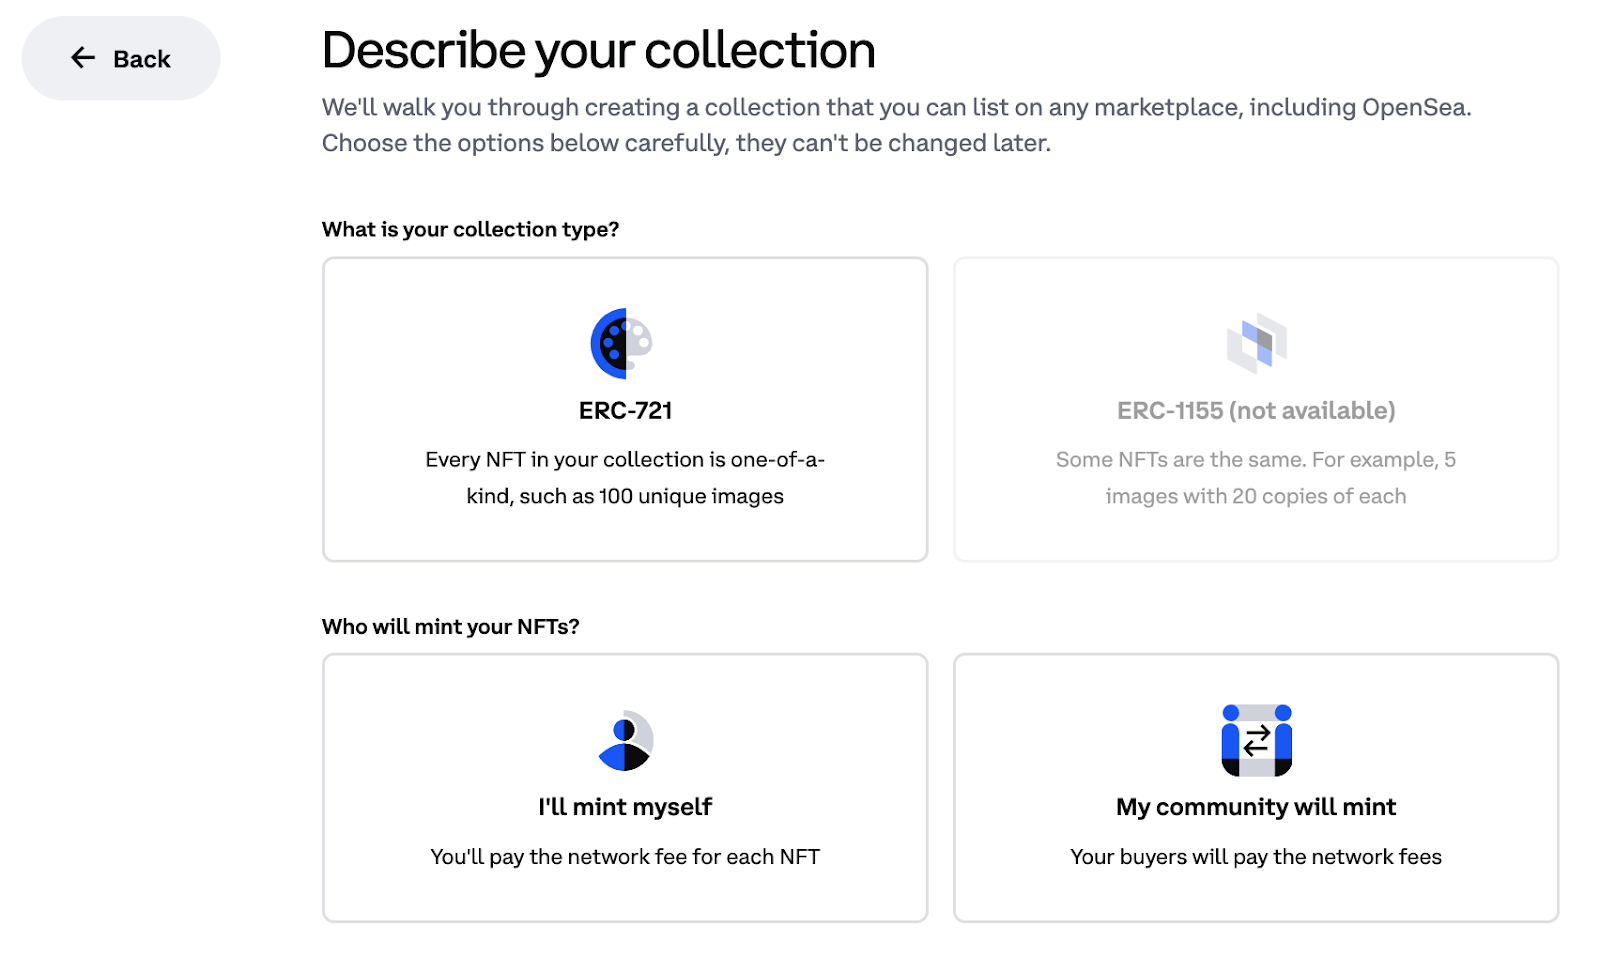
C. Select whether you will mint the NFTs yourself or whether the community will mint the NFTs.
If you choose to mint the NFTs yourself, you will need to pay the network gas fees to mint those NFTs on-chain.
This option can be used if you plan to create NFTs for yourself and/or offer unique pieces for primary sale from your profile where users can select the specific NFT to purchase.
If you choose to have your community mint the NFTs, your community will pay the network gas fees to mint the NFTs directly.
D. Add details to the collection such as an image, the name of your collection, a description of your collection, an Ethereum address to receive your earnings from the mint, and configure the percentage of royalties and recipient address of those royalties for future secondary sales.
Note: these royalties will be applied on sales on all marketplaces that support on-chain royalties.
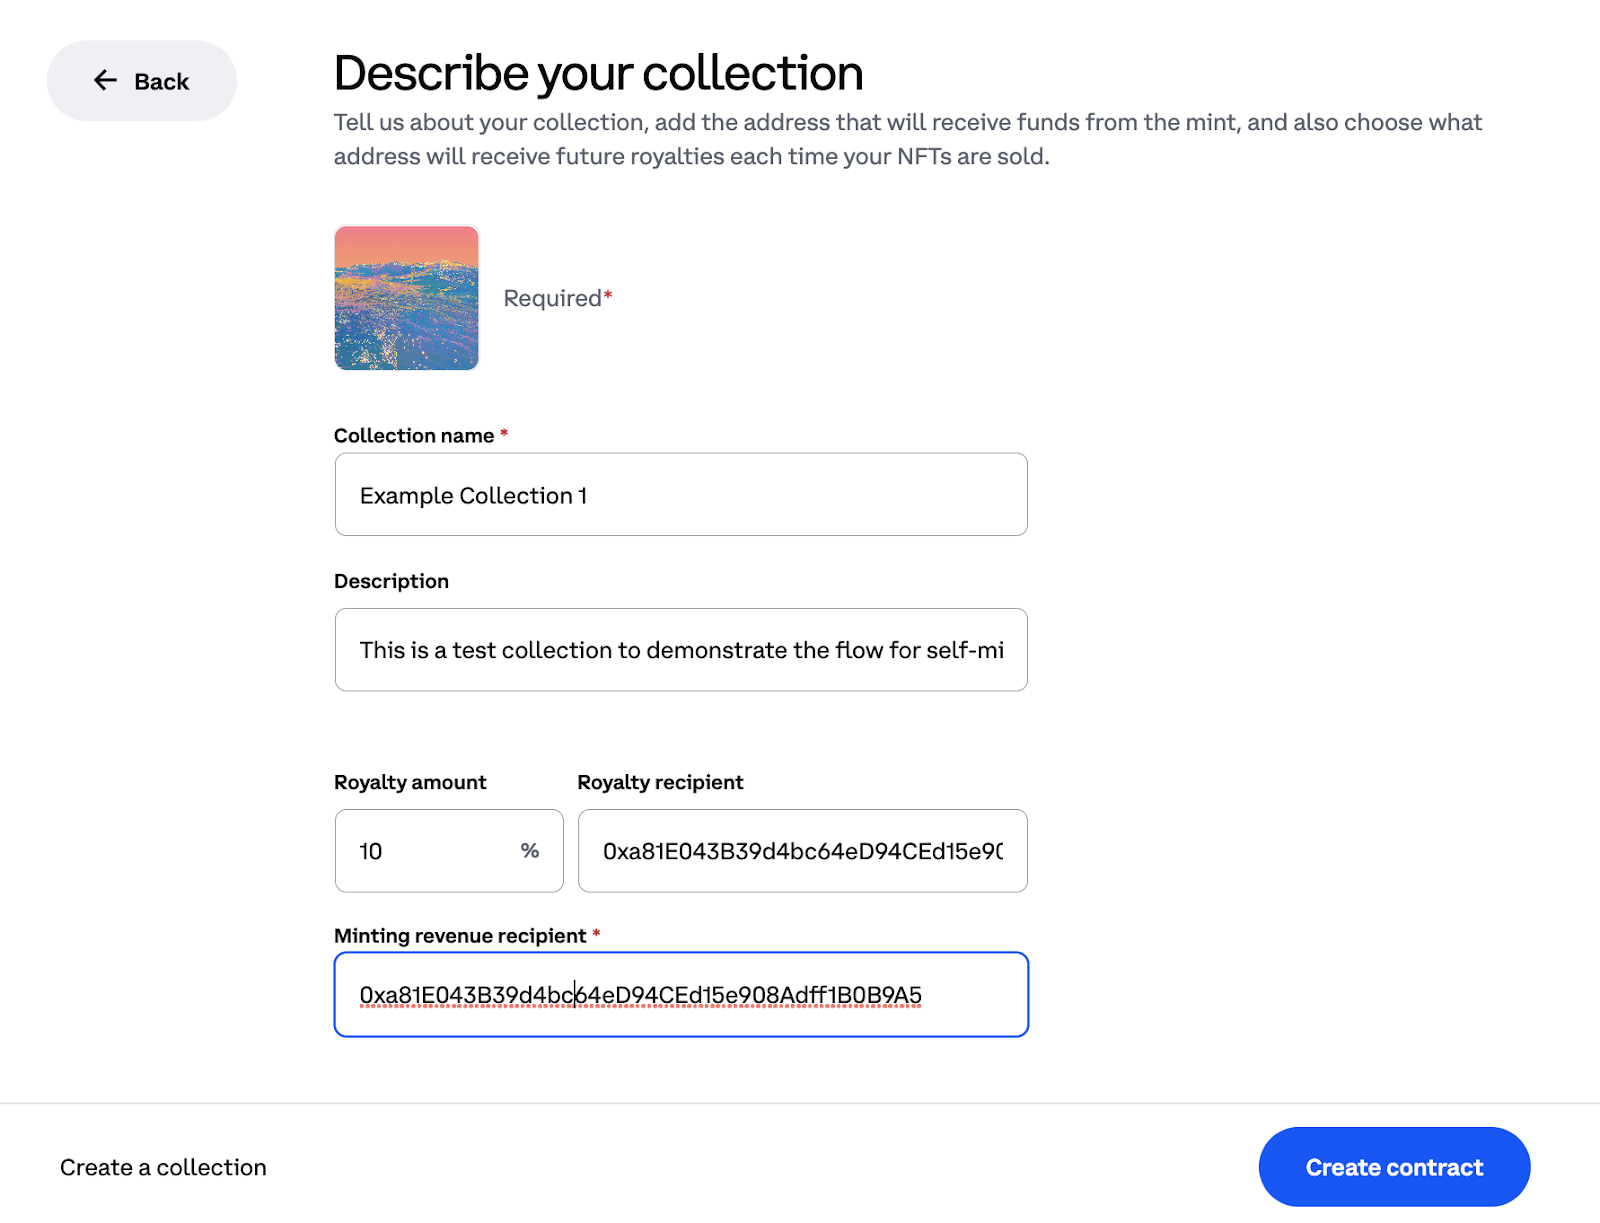
E. After adding these details select ‘Create’ and then ‘Open wallet to confirm’. You will need to pay a gas fee to complete the process, which will deploy the token contract on-chain.
Step 2: Upload Content for tokens in your new collection
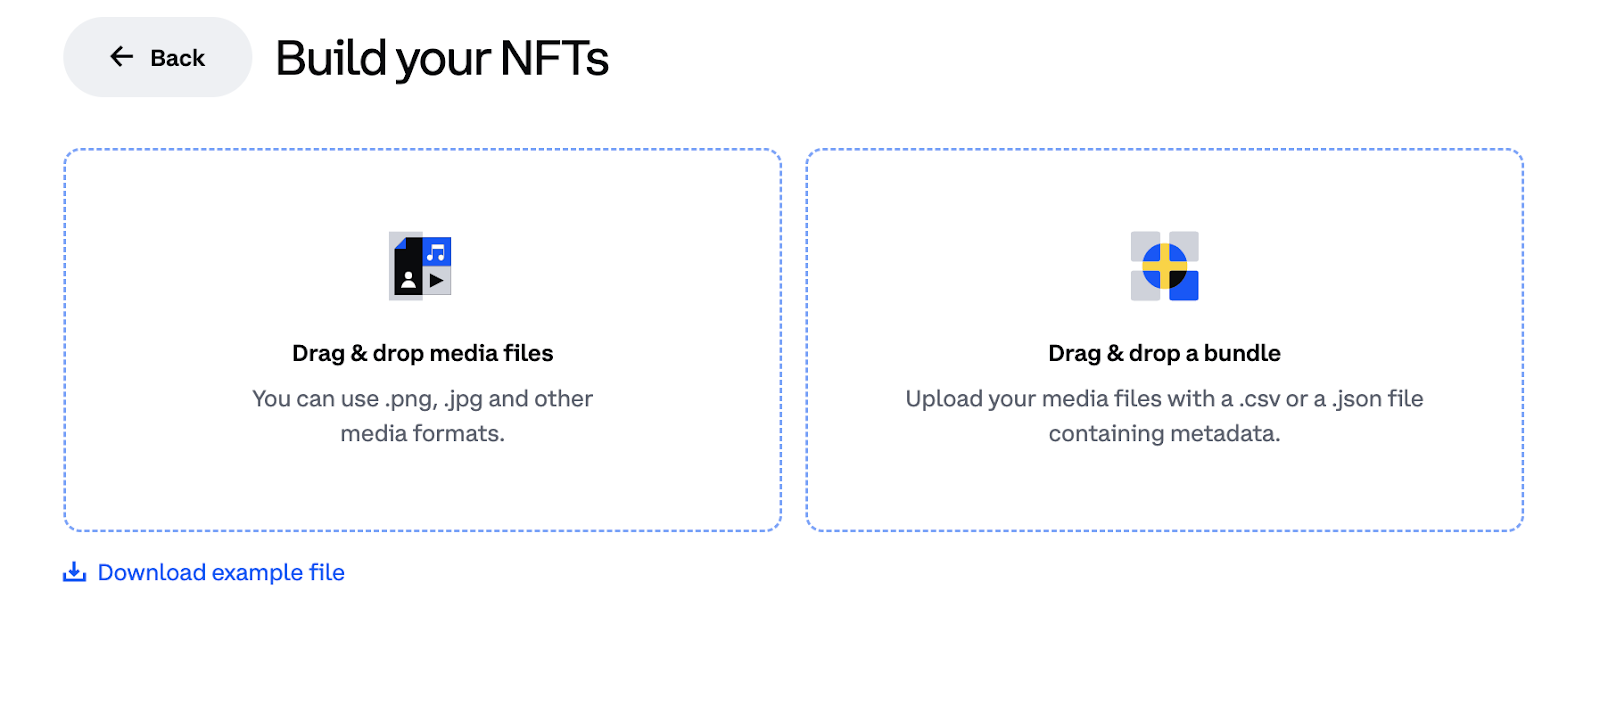
1. Select content to upload that is in a compatible format. Coinbase NFT currently supports many different media files as well as .json or .csv files to update media files and metadata simultaneously.
Choose the “Drag & drop media files”’ option to upload your media files on their own and edit the metadata later.
Choose “Drag & drop a bundle” if you have media files and associated .csv or .json files containing metadata.
You can Download example files directly from this page to help prepare your upload.
Requirements
Files must contain one .csv or .json file with metadata.
The .csv must have a name column, which defines the name of the NFT.
Asset names must be sequential (e.g 0,1,2,3, etc). It won't matter what number you begin with.
Options
Images and other file types can be used in combination.
They both have to follow the asset naming convention above. (Example: 0.png and 0.mp4, 1.png and 1.glb, etc.)
When you select files, we will upload them and pin them to IPFS automatically for you. If you want to map your media files to your NFTs, you can add the name of your files to the image and animation_url column.
If you already have the files uploaded to IPFS, you can add the IPFS hashes to the image and animation_url column.
2. Fill out the token details for each of your uploaded files, including NFT names, token description and attributes. You can also select ‘Add item’ to add additional tokens to your collection.

If you choose to upload all of your content as a batch, you should already have your attributes coded into your files.
Note: Please confirm all details and attributes for ALL tokens are correct and accurate before completing the next step. Once you update the NFTs on your contract on-chain, you cannot edit the details of those specific NFTs.
If you chose the contract option to Mint the NFTs yourself
Select the “Mint” button to create those NFTs on-chain.
If you chose the contract option to have your community mint
Select “Update Contract”.
Step 3: Set Minting Details
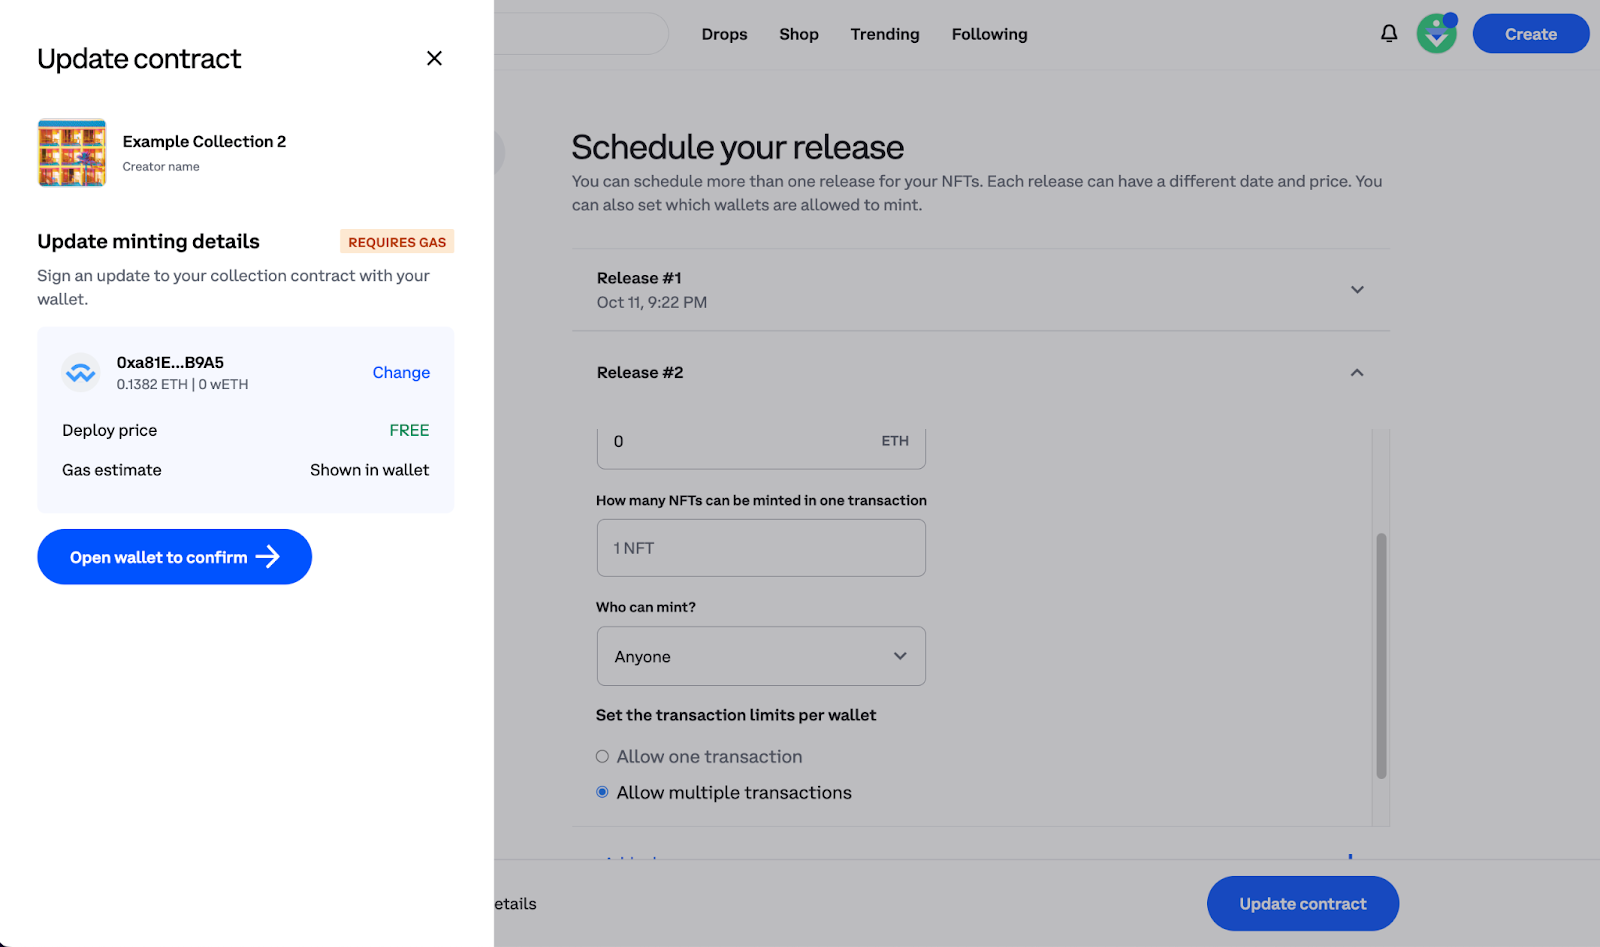
Finally, you need to set listing details and schedule the release for your NFT collection. This includes the start date and time for minting, the minting price for each NFT, the number of NFTs initially available to mint in each transaction and wait time between NFT mints (this prevents collectors from minting most of the NFTs as soon as they become available).
Under the ‘Create a collection’ main menu, select “Schedule listing details”
3. You can schedule more than one release for your NFTs. Each release can have a different date and price. You can also set which wallets are allowed to mint.
Set a start date for minting
Set a mint price for each NFT
Set how many NFTs can be minted in one transaction
Set who can mint
Anyone
Set of wallets
If you’d like to limit what wallets can mint NFTs from your collection during a specific release, you can add a CSV file of wallet addresses that should be given access.
Set the transaction limits per wallet

4. Once you have filled out all the details on the Schedule your release page, select ‘update’ to update the minting contract. This will require a network gas fee.
Optional: List NFTs for Sale
If you chose the option to mint NFTs yourself from your new collection, you can List those NFTs directly from the user interface in the collection editor.
A) Click Start
B) Select which NFTs you want to list for sale and click NEXT
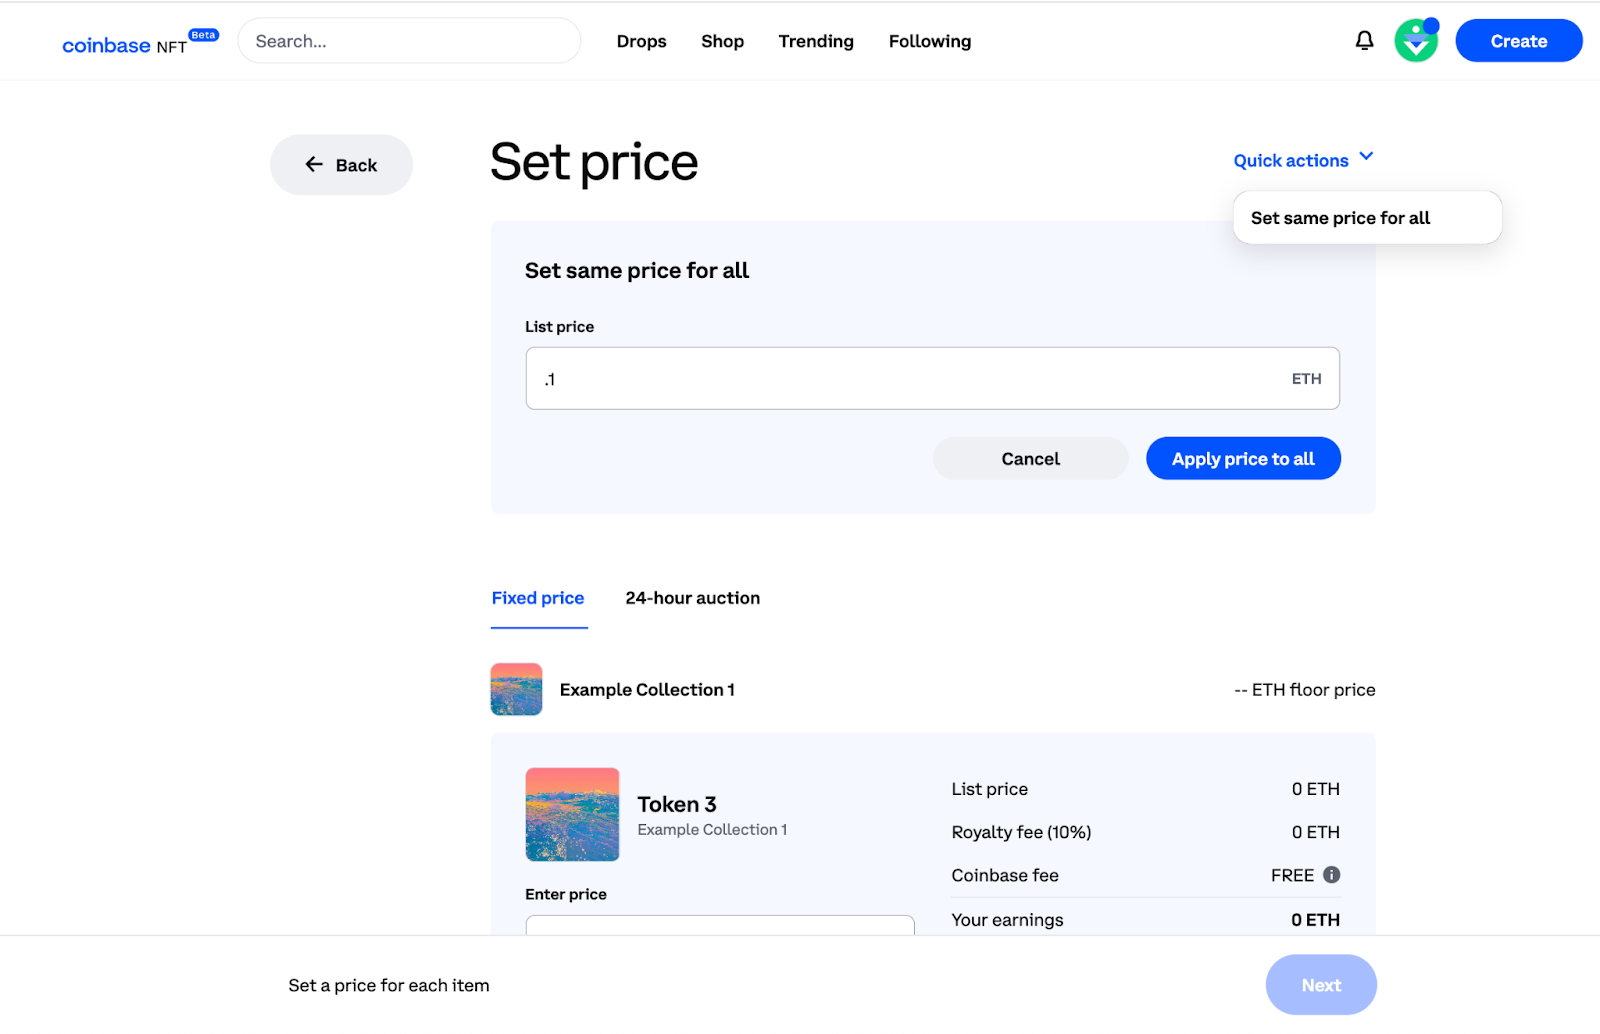
C) Set fixed price or auction listing details. You can apply the same price to all listings using the
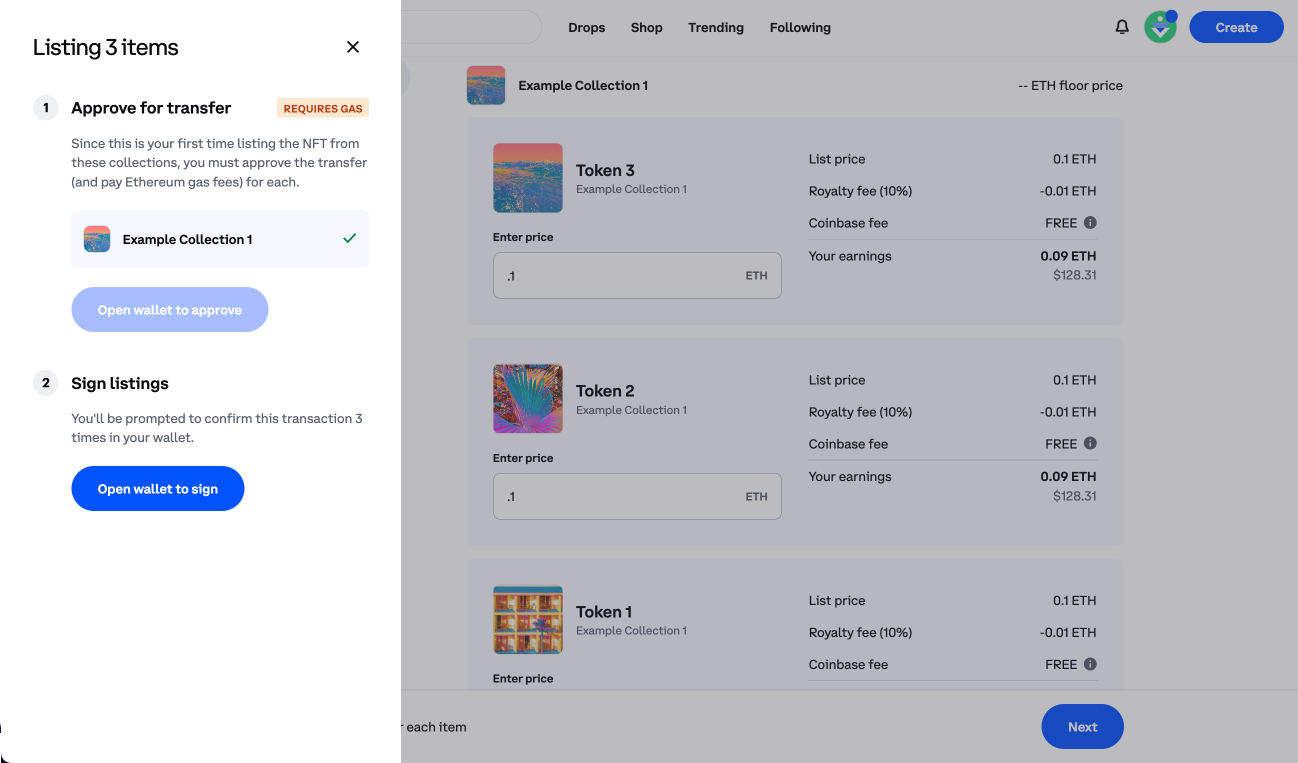
D) Open your wallet to approve Coinbase to list tokens from that collection.
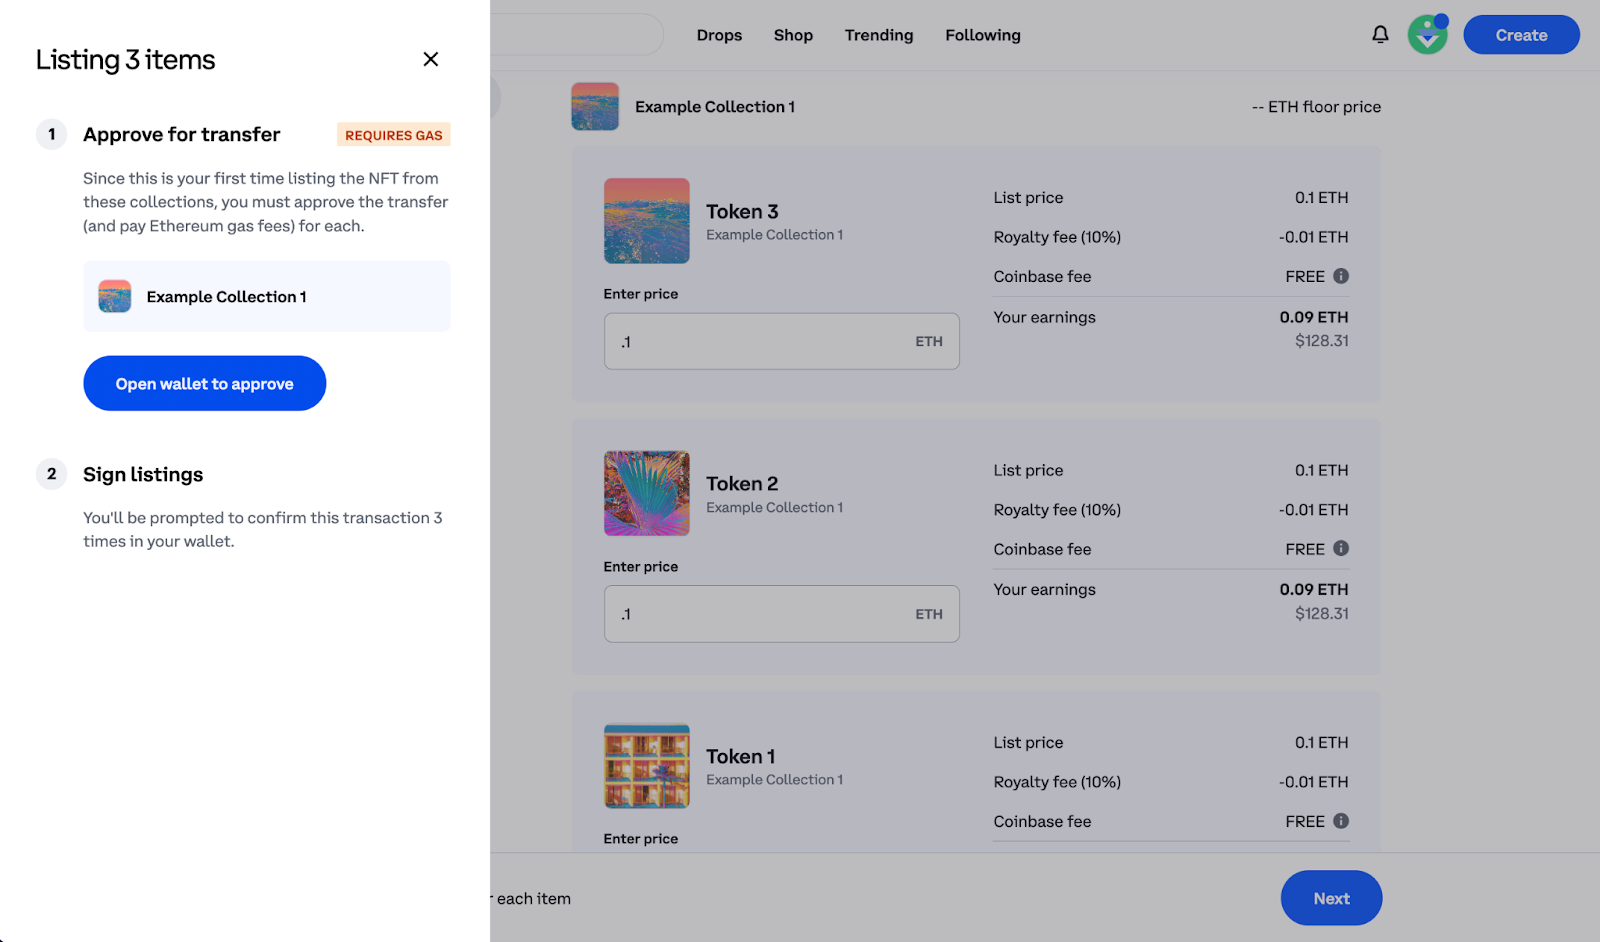
E) Open your wallet to sign each of the individual listings.
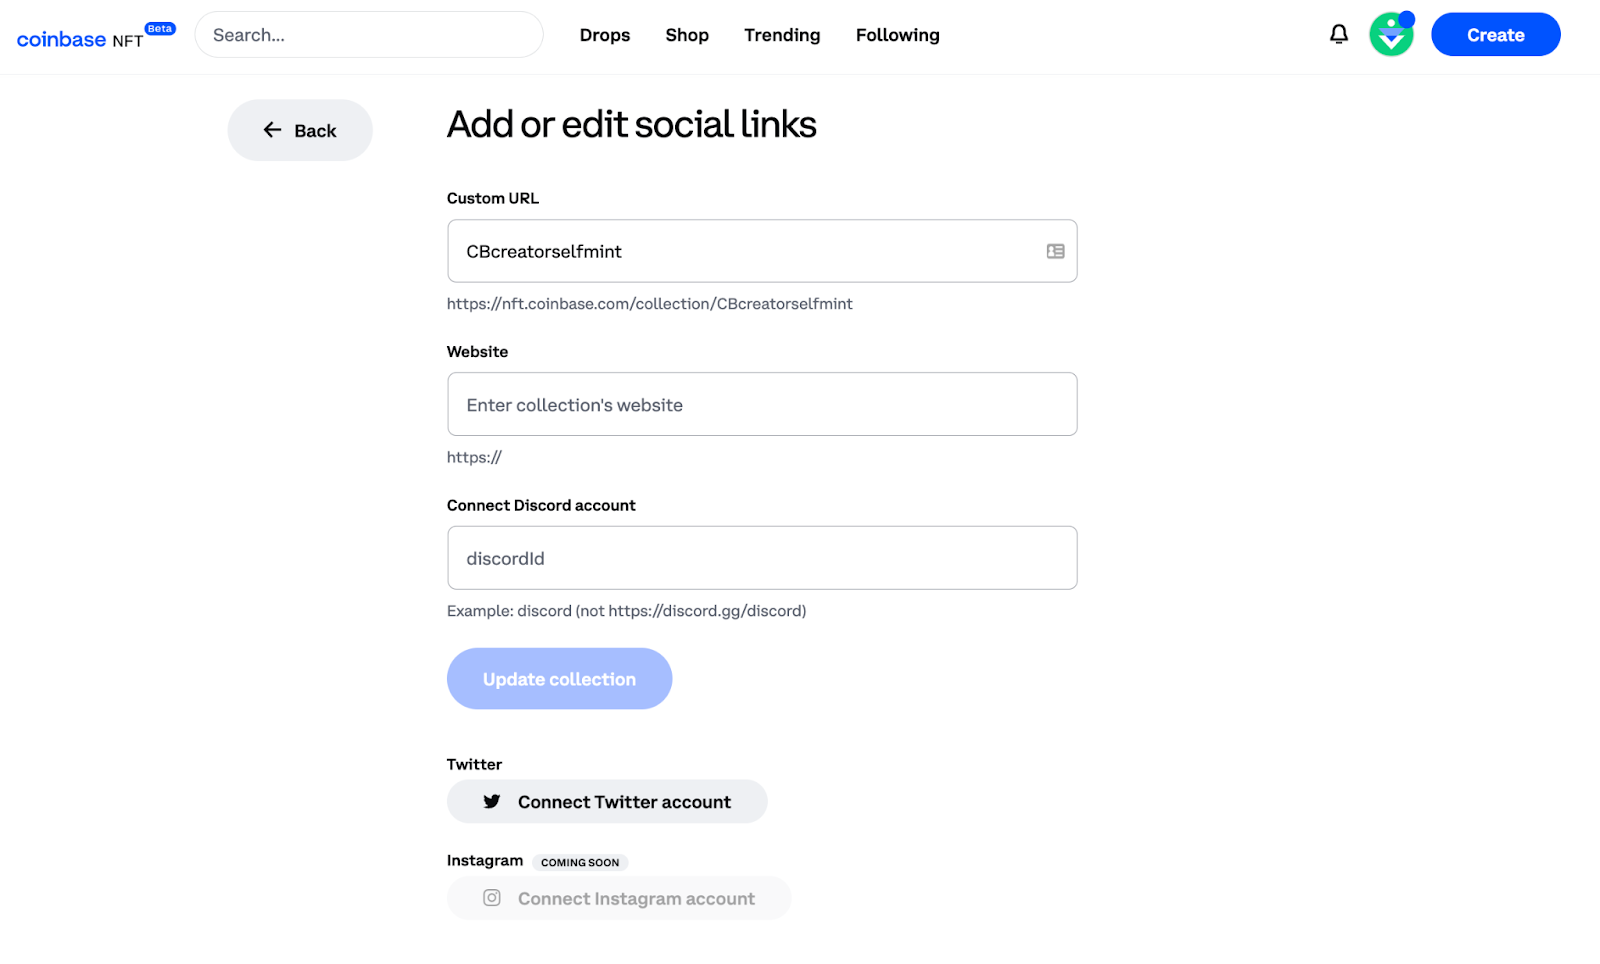
Optional: Add your social media
Once your collection is created, you can choose to add or edit social links to guide collectors to your social media on external sites.