Your web3 wallet allows you to access and interact with decentralized applications in the dapp browser. This includes decentralized exchanges, art and entertainment services.
You will need to first get a web3 wallet from within the Coinbase app and then fund your wallet in order to begin using dapps.
Login to your Coinbase mobile account.
Select ‘Explore’ on the bottom menu of your screen, and then tap dapps.
A pop up will appear introducing the dapp browser.
Select ‘Continue’. Then after reviewing the terms select ‘Agree and get started’.
You will be directed to the dapp browser homepage where you will see the top Dapps, which you can filter by categories like Defi, NFTs, DEXs and more.

Next, you will need to transfer funds into your web3 wallet to begin interacting with dapps.
You can fund your wallet in following way:
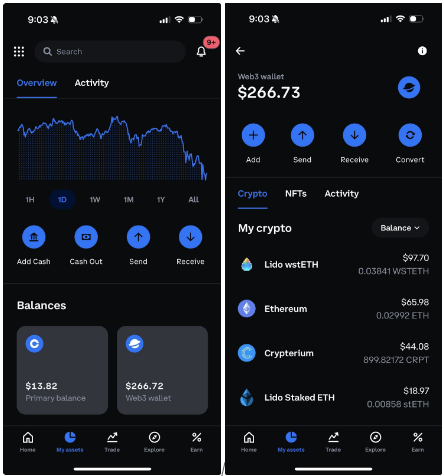
Click on the ‘web3 wallet’ card in the middle of the page. You should see two options; Primary balance (your wallet that is full managed by Coinbase) and web3 wallet (your wallet for accessing Dapps)
Select ‘web3 wallet’, then once you arrive on the web3 wallet page, select ‘Add’.
Select the first option: ‘Transfer within Coinbase’
To start adding funds from your Coinbase Primary balance select the asset you wish to add to your web3 wallet, confirmed the action, and initiate the transfer.

6. The transfer pages will show you the Coinbase fee as well as the network gas fees for your transfer. Visit our help article - DEX trading fees to learn more about gas fees and Coinbase fees when using Dapps.
7. Once you have confirmed the details of the transfer, select ‘transfer now’. Your funds should arrive in your web3 wallet after a few minutes.

Please note that if you have the allowlist feature enabled on Coinbase, you will need to add your web3 wallet to your address book. Otherwise you will not be able to transfer funds from your main Coinbase balance to your web3 wallet. This is also the case if you have the whitelist feature enabled on Coinbase Pro.
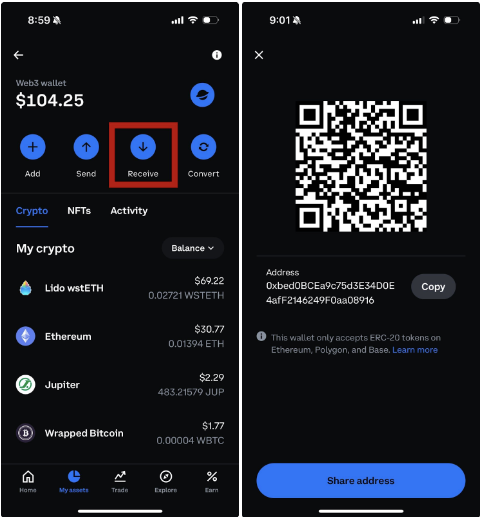
You can get your web3 wallet address by clicking the ‘Receive’ button. When you select this button, you will be taken to the ‘Receive Ethereum’ page where you will be shown your wallet address and a QR code, which is a digital representation of your public key that is easy to scan by digital cameras.
You can also click on “Copy” to copy the address and paste in your sending wallets page.

You need to connect your wallet to a dapp in order to authorize transactions using your wallet's private key to create a digital signature. A digital signature is used to prove that you own the private key associated with your public key and that you have authorized a transaction such as the purchase of an NFT or the transfer of ETH into a Defi lending smart contract.
Connecting your wallet to a dapp is the equivalent to 'logging into a website'. Connecting your wallet to a dapp does not cost any ETH.
Depending on the dapp, it may:
Ask you to connect your wallet prior to navigating to the site and to sign a message authenticating that you are the owner of your wallet.
Prompt you to connect your wallet before approving the transaction.
Allow you to manually connect your wallet by selecting ‘connect’ or ‘connect wallet’ (this button will typically be featured on the Dapp’s home page).
This option should give you a menu of wallets to choose from to connect to the dapp. The web3 wallet and Coinbase Wallet option should be available to you through the dapp’s connection page.
Please note that you should only connect your wallet to dapps that you trust. Coinbase is not affiliated with, and does not endorse, these dapps. Coinbase is not responsible for any lost funds.
Once you have connected to a dapp inside the browser, your web3 wallet should auto-connect the next time you visit the same dapp.
However, there may be times where this auto connection does not work, such as if there are issues with the dapp itself. If this is the case, you will have to click on the ‘connect wallet’ button and choose the ‘Coinbase Wallet’ option again to reconnect to the dapp.
Some dapps will only allow you to connect with certain types of wallets because of settings placed by the developer. In the event that the Coinbase Wallet option is not available, you may have to select another option like Metamask to connect your wallet to the dapp.
To disconnect your wallet from a dapp you will need to do so from directly inside the dapp itself (this option may be displayed on the dapps home page, dashboard or settings). You will not be able to disconnect from a dapp through your web3 wallets settings.
To troubleshoot issues with transferring funds, run through the following checklist:
Check to see if you have funds in your primary Coinbase account.
To fund your Coinbase primary balance go to this help center article for further details.
Confirm that you don't have any account restrictions which prevent you from moving money. If your transaction hasn't been completed yet, wait 30-40 minutes. Depending on the transaction, it may require a certain amount of confirmations on the blockchain before it completes.
Verify that your app is updated to the most recent version.
Close and reopen your app
If these options do not work, try restarting your device.
You can view your balance by selecting your ‘web3 wallet’ under the My Assets page then navigating to the ‘Crypto’ tab. There you will be able to see the balances for whichever cryptocurrencies you have recently purchased or are transferred to your web3 wallet.

There are a few reasons why you may not be able to view a specific token in your Dapp wallet:
You do not have a balance for the token. Make sure you confirm that the funds have successfully been sent.
The transaction has been recently sent and is still in pending status.
A non-supported token was sent to your web3 wallet. The web3 wallet only supports ETH & ERC tokens on the Ethereum mainnet (ERC-20, ERC-721, and ERC-1155). If a different token is sent, it will be unable to be recovered. View here to learn more.
A non-Ethereum token was sent on the blockchain. Initially we will only support ETH transactions.
When you approve a token you are using your private key to create a digital signature which authorizes the DEXs smart contract to spend that token from your wallet. Approving a token requires a small network (gas) fee paid in ETH to the Ethereum network, or MATIC if you are making transactions on the Polygon network.
Signatures are used to help validate transactions on the blockchain and prove ownership of the wallet spending the tokens without exposing its private key. When you sign a transaction you are proving ownership of your wallet account and allowing asset transfers.
A dapp smart contract will sometimes want you to grant permission to access and spend an unlimited amount of tokens in your wallet, as opposed to the amount specified for a particular transaction (this is not always done for malicious reasons but instead to remove the need for users to continuously approve every transaction).
If these permissions are not revoked after a transaction is complete, your funds could be put at risk if the contract is ever exploited by a hacker, or if the team behind the contract are bad actros intent on stealing your funds.
To revoke unlimited token allowances, you can visit revoke.cash, connect your wallet, review each of the tokens listed on the page to see if any have granted permissions to spend unlimited tokens, then select ‘revoke’ to revoke permissions. Revoking permissions will cost a gas fee. You can also revoke token allowances on Etherscan. Please note that Coinbase is not affiliated with, and does not endorse these 3rd party dapps. Coinbase is not responsible for any lost funds when interacting with dapps.
On the assets page of your web3 wallet, go to the ‘Activity’ tab to view all of your transaction history from your web3 wallet in one place.

Currently, you will only be able to use your Coinbase web3 wallet to interact with the Dapp browser.
Web3 wallet currently supports Ethereum, Polygon, and Base networks
Double-check that Web3 wallet supports the network you are receiving assets from, otherwise you won’t be able to access these assets
Sending or receiving unsupported assets through Web3 wallet will cause you to lose them.
Note that this does not impact support of the listed tokens on Coinbase.com or your primary balance on the Coinbase app
Andorra, Australia, Austria, Belgium, Brazil, Bulgaria, Canada, Croatia, Cyprus, Czech Republic, Denmark, Estonia, Faroe Islands, Finland, France, Gibraltar, Greece, Guernsey, Hungary, Iceland, India, Ireland, Isle of Man, Jersey, Latvia, Liechtenstein, Lithuania, Luxembourg, Malta, Monaco, New Zealand, Norway, Poland, Portugal, Romania, San Marino, Slovakia, Slovenia, Sweden, Switzerland, United Kingdom, United States