To get started with the Prime Web3 Wallet, please complete the following prerequisite steps:
User Roles
The following roles are required to enable the Web3 Wallet:
Administrator: A user with the Administrator role will be responsible for the initial web3 set up including signing terms of service and designating the first Web3 Signer. They can designate themselves as the Web3 Signer but they will not have this permission by default.
Web3 Signer: The Web3 Signer will be responsible for generating the portfolio keys, storing the recovery passphrase and signing transactions across all web3 wallets. An iOS mobile device and mobile compatible security key are required.
Obtaining YubiKey
Coinbase will provide all the mobile YubiKeys required for Web3 Signers and those who plan to approve consensus requests via mobile. If you need mobile compatible YubiKeys and Coinbase has not already coordinated this with you, reach out to primeops@coinbase.com or your account manager to request them.
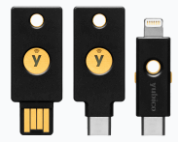
YubiKeys with mobile compatibility include:
YubiKey 5 NFC - USB Type A
Yubikey 5C NFC - USB Type C
YubiKey 5Ci - USB Type C + Lightning
Prime Approvals App
Web3 Signers will hold the shard of the web3 wallet key on their mobile device and use the mobile app to sign all web3 wallet transactions. Users also can access their Coinbase Prime portfolio to view activities, manage consensus activities, and provide video authorization of vault withdrawals.
How to set up the app:
On an iOS mobile device, download the Coinbase Prime Approvals from the app store
If a Web3 Signer deletes or uninstalls the Prime Mobile App or reset their phone, it will delete the local key shard for that user.
Log in using your existing username and password.
You can set your device to use passkey to save your credentials (key symbol on your keyboard) if desired
Verify with your YubiKey
If using a YubiKey USB 5Ci: plug in the lightning connector side of your key and tap the metal bars on either side with
If using a YubiKey USB A or C NFC: hold the YubiKey near the top left back corner of your phone
Learn more about the Coinbase Prime Approvals Mobile App here.
Select the Initial Web3 Signer
Once the above prerequisites have been completed, an Administrator in this portfolio should take the following steps:
Once logged into Prime, click the Web3 icon on the left navigation bar to access the Web3 page.
Select “Get Started”.
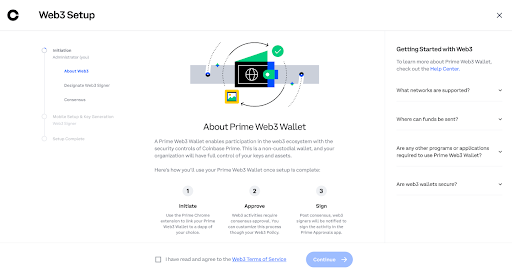
Sign the Prime Web3 Wallet Terms of Service.
4. Select the initial Web3 Signer from the drop down and approve with your Yubikey
5. Reach consensus to designate the Web3 Signer permission.
Web3 Signers must have:
Role: Administrator, Approver, Authorized Signatory or Full Trader.
Equipment: iPhone and mobile compatible Yubikey.
Generate a Web3 Wallet & Store Recovery Phrase
The Web3 Signer should take the following steps once permission is granted:
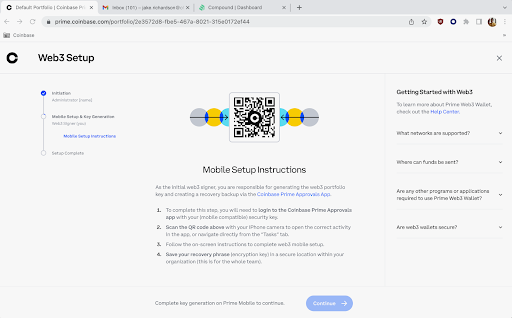
Navigate to the Coinbase Prime Approvals mobile app to generate the web3 wallet and key. A QR code can be scanned on Prime web from your phone to navigate to the Prime mobile app.
2. Sign into the mobile app with your existing Prime username, password, and Yubikey.
Start web3 wallet set up.
Enable biometrics.
Generate the Web3 key. This will also require a biometrics check.

Click Create Recovery Backup, which will generate a passphrase that will be required to unlock it. Biometrics check will again be required.
Save & Confirm the Recovery Passphrase. It is critical that you save & store the passphrase, this passphrase is required if you lose access to your Web3 key shard to regain access to your wallet. Make sure to not lose it or you risk losing access to the wallet and any funds held on it.
Once confirmed, you should see the Web3 Wallet tab on the left hand side within the Prime portfolio.
Note: It may take a few minutes for the wallet to display. You can try exiting and re-opening the platform and refreshing the Prime UI page to update the display.
Navigate to the Prime Web, under Web3 to view your wallet which comes with another address.
You can now fund your wallet & download the Prime Web3 Wallet extension
Fund your Wallet
You can now login to the Prime extension to start using your wallet. Once you have created your Web3 Wallet, you may proceed with depositing funds to that new wallet. Please follow the instructions in this link for more information:
Download the Prime Web3 Wallet Extension
On your computer, log into Coinbase Prime
Click the Web3 icon on the left navigation bar to access the Web3 page
Locate the prompts on the right hand side and click the arrow until you see the “Download Prime Extension'' prompt.
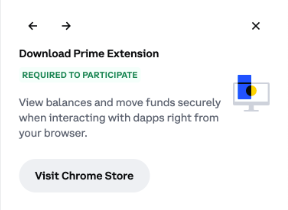
4. Click visit Chrome Store to get to the Prime Web3 Extension page.
5. On the right hand side, click the button labeled “Add to Chrome”

6. Click the Puzzle icon on your Chrome browser and click the pushpin icon to pin it to your browser window
7. If Prime is open on the same browser, you will be automatically logged in
8. If not, open the Chrome extension and login using your existing Prime username, password and Yubikey
Add multiple Web3 Signers (Optional)
The Prime Web3 Wallet is a non-custodial wallet. Maintaining access to your wallet key shard is critical. Ensure you have multiple web3 signers and have safely stored your recovery passphrase should you need it. If all signers lose access to the shard and you do not have your recovery passphrase, Coinbase cannot assist with recovery.
Create Another Wallet under the Portfolio (Optional)
Once created, the wallet will have a single address. It is however possible to generate more addresses for that same wallet in that portfolio. It is a way to segregate funds on chains to addresses with different purposes.
Log into your Prime account.
Click into the Explore tab on the left hand side of the landing page.
Select “Create New Wallet” and name the wallet
Approve the action with your Yubikey on the platform and once consensus is reached, the new wallet will be created.